Remix JS: a new fullstack framework

Introduction
Javascript has been the main tool used by developers to power websites for the past 25 years. As the language was popularized, many frameworks and libraries were created in order to make development faster, for both frontend and backend. Nowadays, there are a lot of widely used javascript frameworks. One of the most popular ones is React, which can be used to build sleek fronted components. In this article, we will talk about a new, React inspired framework, called Remix. Remix is a full stack web framework, based on React, that was released in November 2021. It is focused mainly on UI and UX, and its main objective is to create fast websites and eliminate as many loading states as possible. In order to achieve this, Remix uses server side rendering to prefetch data including public data, user data, modules or CSS. It also uses built-in data updates, through the use of HTML forms: by just creating a form and an action associated with it on the server, Remix is capable of handling these actions server-side, revalidate data, and handle race conditions from resubmissions. Remix applications use either Javascript or Typescript, and can be run on any browser that supports javascript ES modules. However, the idea behind it allows for most basic pages to run without having javascript enabled. This way, it’s possible to have a basic interface that is fully functional, but can be enhanced through javascript.
Folder structure
Remix projects can be easily created by running the following command:
It runs a setup script that can create an app configured to fit the needs of the user generating a project with the following folder structure:
Let’s see what some of these files and folders are used for:
- app/entry.client.jsx: Contains the first Javascript code that runs when the browser loads.
- app/entry.server.jsx: Contains the first Javascript code that runs when a request to the server is made. Remix then handles all necessary data and the only thing left to do is to create a response.
- app/root.jsx: Contains the root element of the application. Here is where the
<html>tag is placed. - app/routes/: This folder contains the different “route modules”. The files in this folder define the different URLs for the app, based on the names of the files.
- public/: Contains all static assets, such as images, fonts, css, etc.
- remix.config.js: This file allows the user to change some of the default configurations provided by Remix.
Data Loading
So how does Remix work? In order to properly understand this framework, a key concept has to be understood: Remix routes. Routes are frontend components that are also their own APIs routes, and can handle communication with the server from the browser on their own. They work in a similar fashion as Rails views, only using React as a format and without the need to use JQuery to improve user interaction. A remix route has therefore two main parts: a component and a loader. Loaders are the backend "API" for their component, and run exclusively on the server. They can interact directly with the database, and can use any database or data persistence services available, or can make calls to external APIs. So, in order to get data for a component through navigation, a user would need to write code such as this one:
If we take a close look into this code, we can see how the loader function gets the data through some unspecified means, and then the component consumes it using the useLoaderData hook.
It is also possible to get data outside of navigation, in cases where the loader function is needed for something in a route but additional queries still need to be made. For example, one might need to access another route's data to fill the options in a combobox that suggests information to the user. For this sort of situation, a hook called useFetcher can be used, in a similar manner to how one would use the useLoaderData hook. One might then have a route called “cities-search.tsx”, and then the following on a combobox component:
Routing
As was mentioned briefly in the description of the project's structure, Remix routes also define the URL structure of the website. For example, if a file called ‘home.jsx’ was created on the routes folder, a route ‘/home’ would be automatically created and associated with the file. However, this only scratches the surface of the available routing functions of Remix.
One of the core features of Remix are nested routes which match segments of the URL to component hierarchy in the UI. The idea behind this is that URL segments usually determine one of these three options:
The layouts to render on the page
The code split JavaScript bundles to load
The data dependencies of those layouts
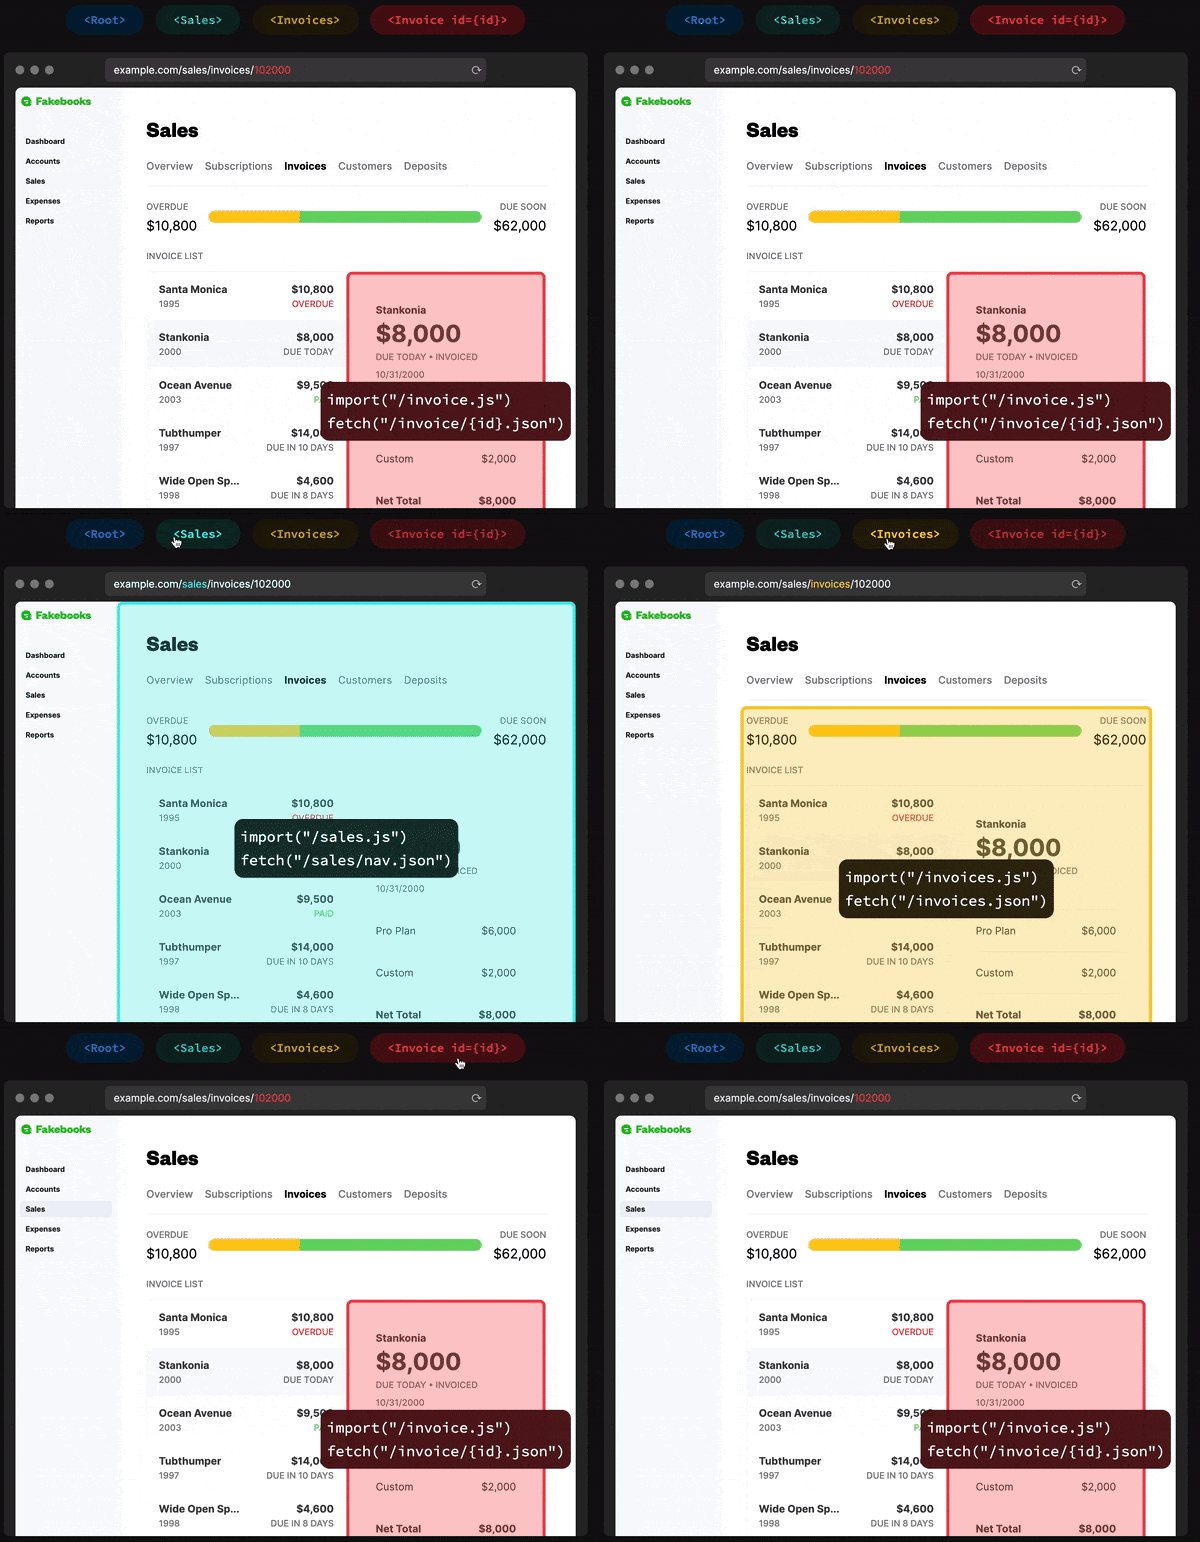
Remix provides a way to render all of these options, maintaining the hierarchy between them. In order for this to work, each component that receives a child route must have an <Outlet /> component that shows where to render the matching child route. So let’s imagine we have the following structure:
When the user visits this page, assuming all the parent layout routes have an <Outlet /> component, Remix will render the components in this hierarchy that matches the hierarchy defined by the folder structure:
Which would in turn render an application such as this one:

Note how, in order to define a dynamic route, the file name must have the syntax $<VARIABLE>.jsx, like the file invoiceId.jsx. It could go a step further, in cases when the developer wants to add an unspecified amount of variables to the URL. In those cases, the developer could use a file called $.jsx also known as a splat. In these cases Remix will match any value in the URL for the rest of the URL to the end. Unlike dynamic segments, a splat won't stop matching at the next /, it will capture everything.
These structures can have as many levels as needed. The user might even want to set a default value for this structure and can do so by defining an index route:
So the content of this file is what would show up if a URL without an invoice Id was called.
Remix offers some flexibility with their nested routing. For example, it is possible to have a nested route without an accompanying nested layout. To do this, one would define the same hierarchy that would be used in the folder structure to define the desired URL, but within the name of one file. So, if we follow the same example as before we would have:
The inverse case is also possible: we could want a nested layout on a simple URL. To achieve this, we can remove part of the nested URL from the folder structure by adding two underscores before the name. So, if we wanted to remove the sales part from the example shown before:
Now all that’s left to understand is how one would access the information passed to the pages through dynamic routes. In the component, the user can call the Remix hook useParams to access this information and in server side functions such as the loader the params can be received as a function argument.
And that 's it! The user can then use these params as he would on any other React or Node application.
Resource Routes
There are cases where a user might want to create a route that is not directly linked to an API or a component. These could be, for example:
- API endpoints.
- Dynamically generating PDFs or images.
- Webhooks for other services like Stripe or GitHub.
To implement these cases, the user would define a resource route, which is a route that doesn't export a component. Resource routes only export a loader, whose response is automatically given when the user calls the URL with the GET method. Other methods can be added if they are needed.
A small, yet important detail that arises when using resource routes is linking: it has to be done with either a <Link reloadDocument> or a plain <a href>. If the link is created as a normal <Link to="pdf">, the route will be treated as a UI route.
Error handling
One of the last interesting features of Remix that we will talk about is error handling. Remix can automatically catch most code errors, whether they occur on the server or on the browser. These errors are then rendered on the closest component of the kind <ErrorBoundary>, a React component that renders each time an error occurs on any part of the route it is a part of. If a template is used, an <ErrorBoundary> will most likely be automatically present in the root of the project.
This greatly simplifies error handling: the user does not have to worry about showing specific error messages on each case, as everything is handled automatically.
Styling
Adding CSS to a Remix project is relatively easy, although not as simple as it may be on React, or on other frameworks such as Next Js. First, the user has to create a .css file anywhere inside the app folder, then import it into the route where he wants to use it. Then, in the component, the user adds a Link with the desired CSS like this:
In order for this to work, the user has to additionally include the Link component provided by Remix somewhere within the root component, normally within the <head> tag. This is necessary because Remix associates links to routes, so that the CSS imported on a route will only be available on that specific route in order to avoid conflicts with CSS classes.
Additional CSS preprocessors, such as SASS or LESS, can be included but aren't naturally supported: the user must separately run a compile script for these files that will generate their corresponding CSS. This CSS is the one that will effectively be used by the page. This is worth noting as it can be a bit bothersome for some users.
In Conclusion
Remix provides an interesting and dynamic way to create user interfaces that load extremely fast and handle errors automatically. It offers multiple ways to load and offer data, in a much simpler and condensed way than traditional fullstack applications where there is usually a backend that offers APIs and a frontend that consumes them. Remix offers an array of interesting features, meant to offer pages with almost no loading, but also to generally improve the user experience. This article only scratches the tip of the iceberg on what’s offered and more information along with examples and tutorials can be found on their official documentation. This new framework is off to a very promising start, but any users interested in trying it out should be warned: it is a very recent project, and bugs may still arise!