Scratching the surface of three.js

Three.js
Three.js is a JS library used to create 3D visuals and experiences for the web. It uses webGL in the background, a JS API that is great at creating shapes, light sources, etc. The problem is it doesn’t have the best developer experience by itself, and that is something crucial, especially when working with something as complicated as 3D.
Three.js can be used in any JS web project, it isn’t specific to just React, but to get the best experience possible while rendering 3D on our browsers (with react), there's react-three-fiber to make our lives even easier by turning your Three.js functions into React components and hooks.
In this article, you'll learn how to transform an SVG into a 3D object, add rotation controls, and enhance it with lighting. Let's dive in!
(If you want to jump straight to the solution, here's the github repository)
In case you’re working on this project from the beginning, you can start with a React and TypeScript Vite app:
We move into the directory:
Then install threejs and react-three-fiber (it even has react native support!)
to run the app, simply:
By now we just have the default Vite + React page, but we can start playing around with three.js
Actual Three.js
Let's replace the App function with the following:
This piece of code does nothing more than starting off with a white Canvas (rendered by react-three-fiber). We create a mesh, aka a scene object, which will “wrap” the pieces needed to draw a 3D shape.
The boxGeometry indicates we’re going to be working with a Box-y shape, and the meshStandardMaterial will be in charge of the looks of that box

Let's now add some color to the box, by adding the color property to the material element. But you’ll quickly notice this isn’t enough. As we’re working with 3d rendering, a blue box will look the same as any box would on a dark room, we must add some light sources (just below our mesh is fine):
Now we can actually "see something":

Let's add some react to the mix. A simple light intensity controlled input:
Now we can control the intensity of one of the light sources.
Before moving on, lets tidy up just a little bit:
And on the same directory:
U(R)FO - Unidentified Rotating Flying Object
React Three Fiber brings some new hooks to the table. One of them is called useFrame , it has a similar behavior as useEffect, in the way it runs "on its own” when something updates. In this case useFrame runs on each frame update instead of reading from a dependency array.
Be mindful of the code that gets run inside a useFrame, its purpose is to do some minor calculations and update just stuff inside the Canvas . useFrame will crash the app if you try to call it in a component that isn’t inside a Canvas component, that's part of the reason why we tidied up before.
To update solely whats inside a Canvas, we will work with a reference of the mesh have. Let's dig in!
By attaching the meshRef ref to the mesh, duh, and updating its rotation property on each axis on the useFrame, we get this fancy rotation of our cube:
SVG Loader
We’ve already played around a bit with the different simple options available on Three.js such as light, color, position and rotation, so lets dig into a custom shape.
We have our neocoastLogo.svg , and we want to render it, add some depth to it:

To do this, we want to import the svg asset, bring in the hook useLoader from react-three-fiber and the SVGLoader from Three.JS addons (these addons are built in, so no need to install them separately). useLoader is a hook that loads assets with a certain loader, it renders a fallback using React’s Suspense while its loading. These loaders are functions that are able to parse and transform complex assets into groups of simpler shapes, which can be then rendered as meshes. Some loaders are more recommended than others, for example GLTFLoader, OBJLoader, TextureLoader, FontLoader, etc, are better maintained than SVGLoader but you’d have to have your asset in these formats to use them, and each one of them has their own use case.
We use useLoader to load the logo svg with SVGLoader and we obtain an array with the “paths” of the svg. We replace our box Geometry shape with a group , to make sure that every time we play around with the rotation, or any property, we will be applying the changes to the whole svg and not the individual paths. Within this group we can render a mesh for each shape inside each of the paths in the array, by using toShape to turn each path into an array of different shapes, and using extrudeGeometry to render this complex—but still simpler than the whole svg itself—shape.
As the whole svg is considered a plain image, each of their parts is too. Adding a depth, in this case 50, will render it as a 3D object on screen.
You’ll also notice there’s an initial rotation on the Y axes thats Math.Pi, this is because the svg is rendered flipped by default, and the rotation is measured in radians. As for the position, moving it to [2,-1,-1] made it look centered enough.
You can also update the code a bit on App.jsx to make everything look a bit larger
And the partial result is:
Rotation on demand
Still around for more? Great! Let's dig into the last part of this 101: controlling the 3D render. To do so we will be working with Drei, a package that adds helpers and functional abstractions to what we already rendered with react-three-fiber.
To install, simply:
Then, we will import OrbitControls from "@react-three/drei", add it to our component, and you’ll quickly see you’re able to move the 3d render around. Keep in mind this movement is from the camera and not from the item rendered itself, so it will continue rotating on its own as well.
Now, to tidy things up, and also wrap up, we will update some of the code, removing the “automatic” rotation we have for the render via useFrame, which will be replaced with the autoRotate property on OrbitControls , along with autoRotateSpeed to set up the speed to with it rotates automatically of course.
You’ll notice the position and rotation of the group was moved again, and that the orbit has its own target property with some numbers. This was updated to have the group in the center, and to make sure the camera moves around the center of the group and not around another point in the 3D space.
There’s also another directionalLight to have another light source illuminating our space.
With this, you should be able to see our beautiful creation, and move the camera around it freely!
Here's the link to the github repository to check the solution out!
ThreeJS is a powerful tool, and react-three-fiber and drei simplify a lot of the complexity that comes with rendering 3D world on the web.
Disclaimers
We might stumble into some warnings/errors from eslint that show unknown properties on the tags that are not that HTML friendly
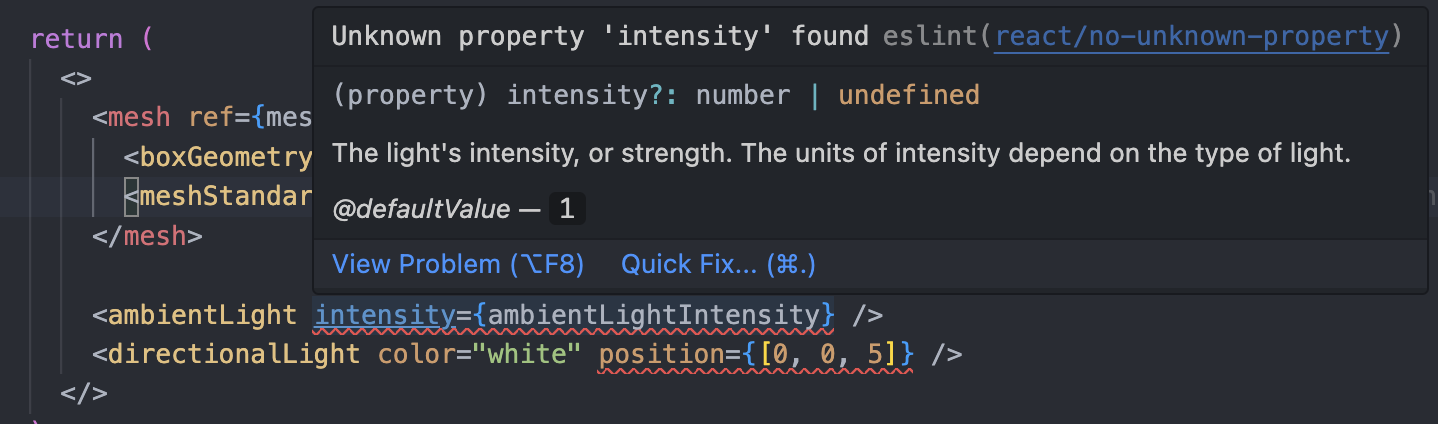
This error is triggered by using a non HTML based property, like “intensity”. Feel free to read this github issue conversation that sadly didn’t get anywhere, and also use react-eslint-plugin’s recomendation on these cases
Source:
https://threejs.org/docs/index.html#manual/en/introduction/Installation
https://r3f.docs.pmnd.rs/getting-started/your-first-scene