Efficient File Management in Rails APIs: Direct Uploads Explained

Introduction
When building a web app, it is quite common to allow your end users to upload files for different features your product may provide. While managing small-sized files, like low-quality images, poses minimal challenges and doesn't prompt much concern about performance, the narrative shifts when confronted with larger files, such as high-resolution videos.
In this article, we explore two different approaches for managing file uploads using ActiveStorage from a Rails API coupled with a ReactJS frontend.
Traditional file uploads with Rails
The default/traditional way of dealing with file uploads in Rails has been, for a while, sending the file to the main Rails server, which subsequently forwards it to our chosen storage service (for our practical example, we'll be using AWS S3).
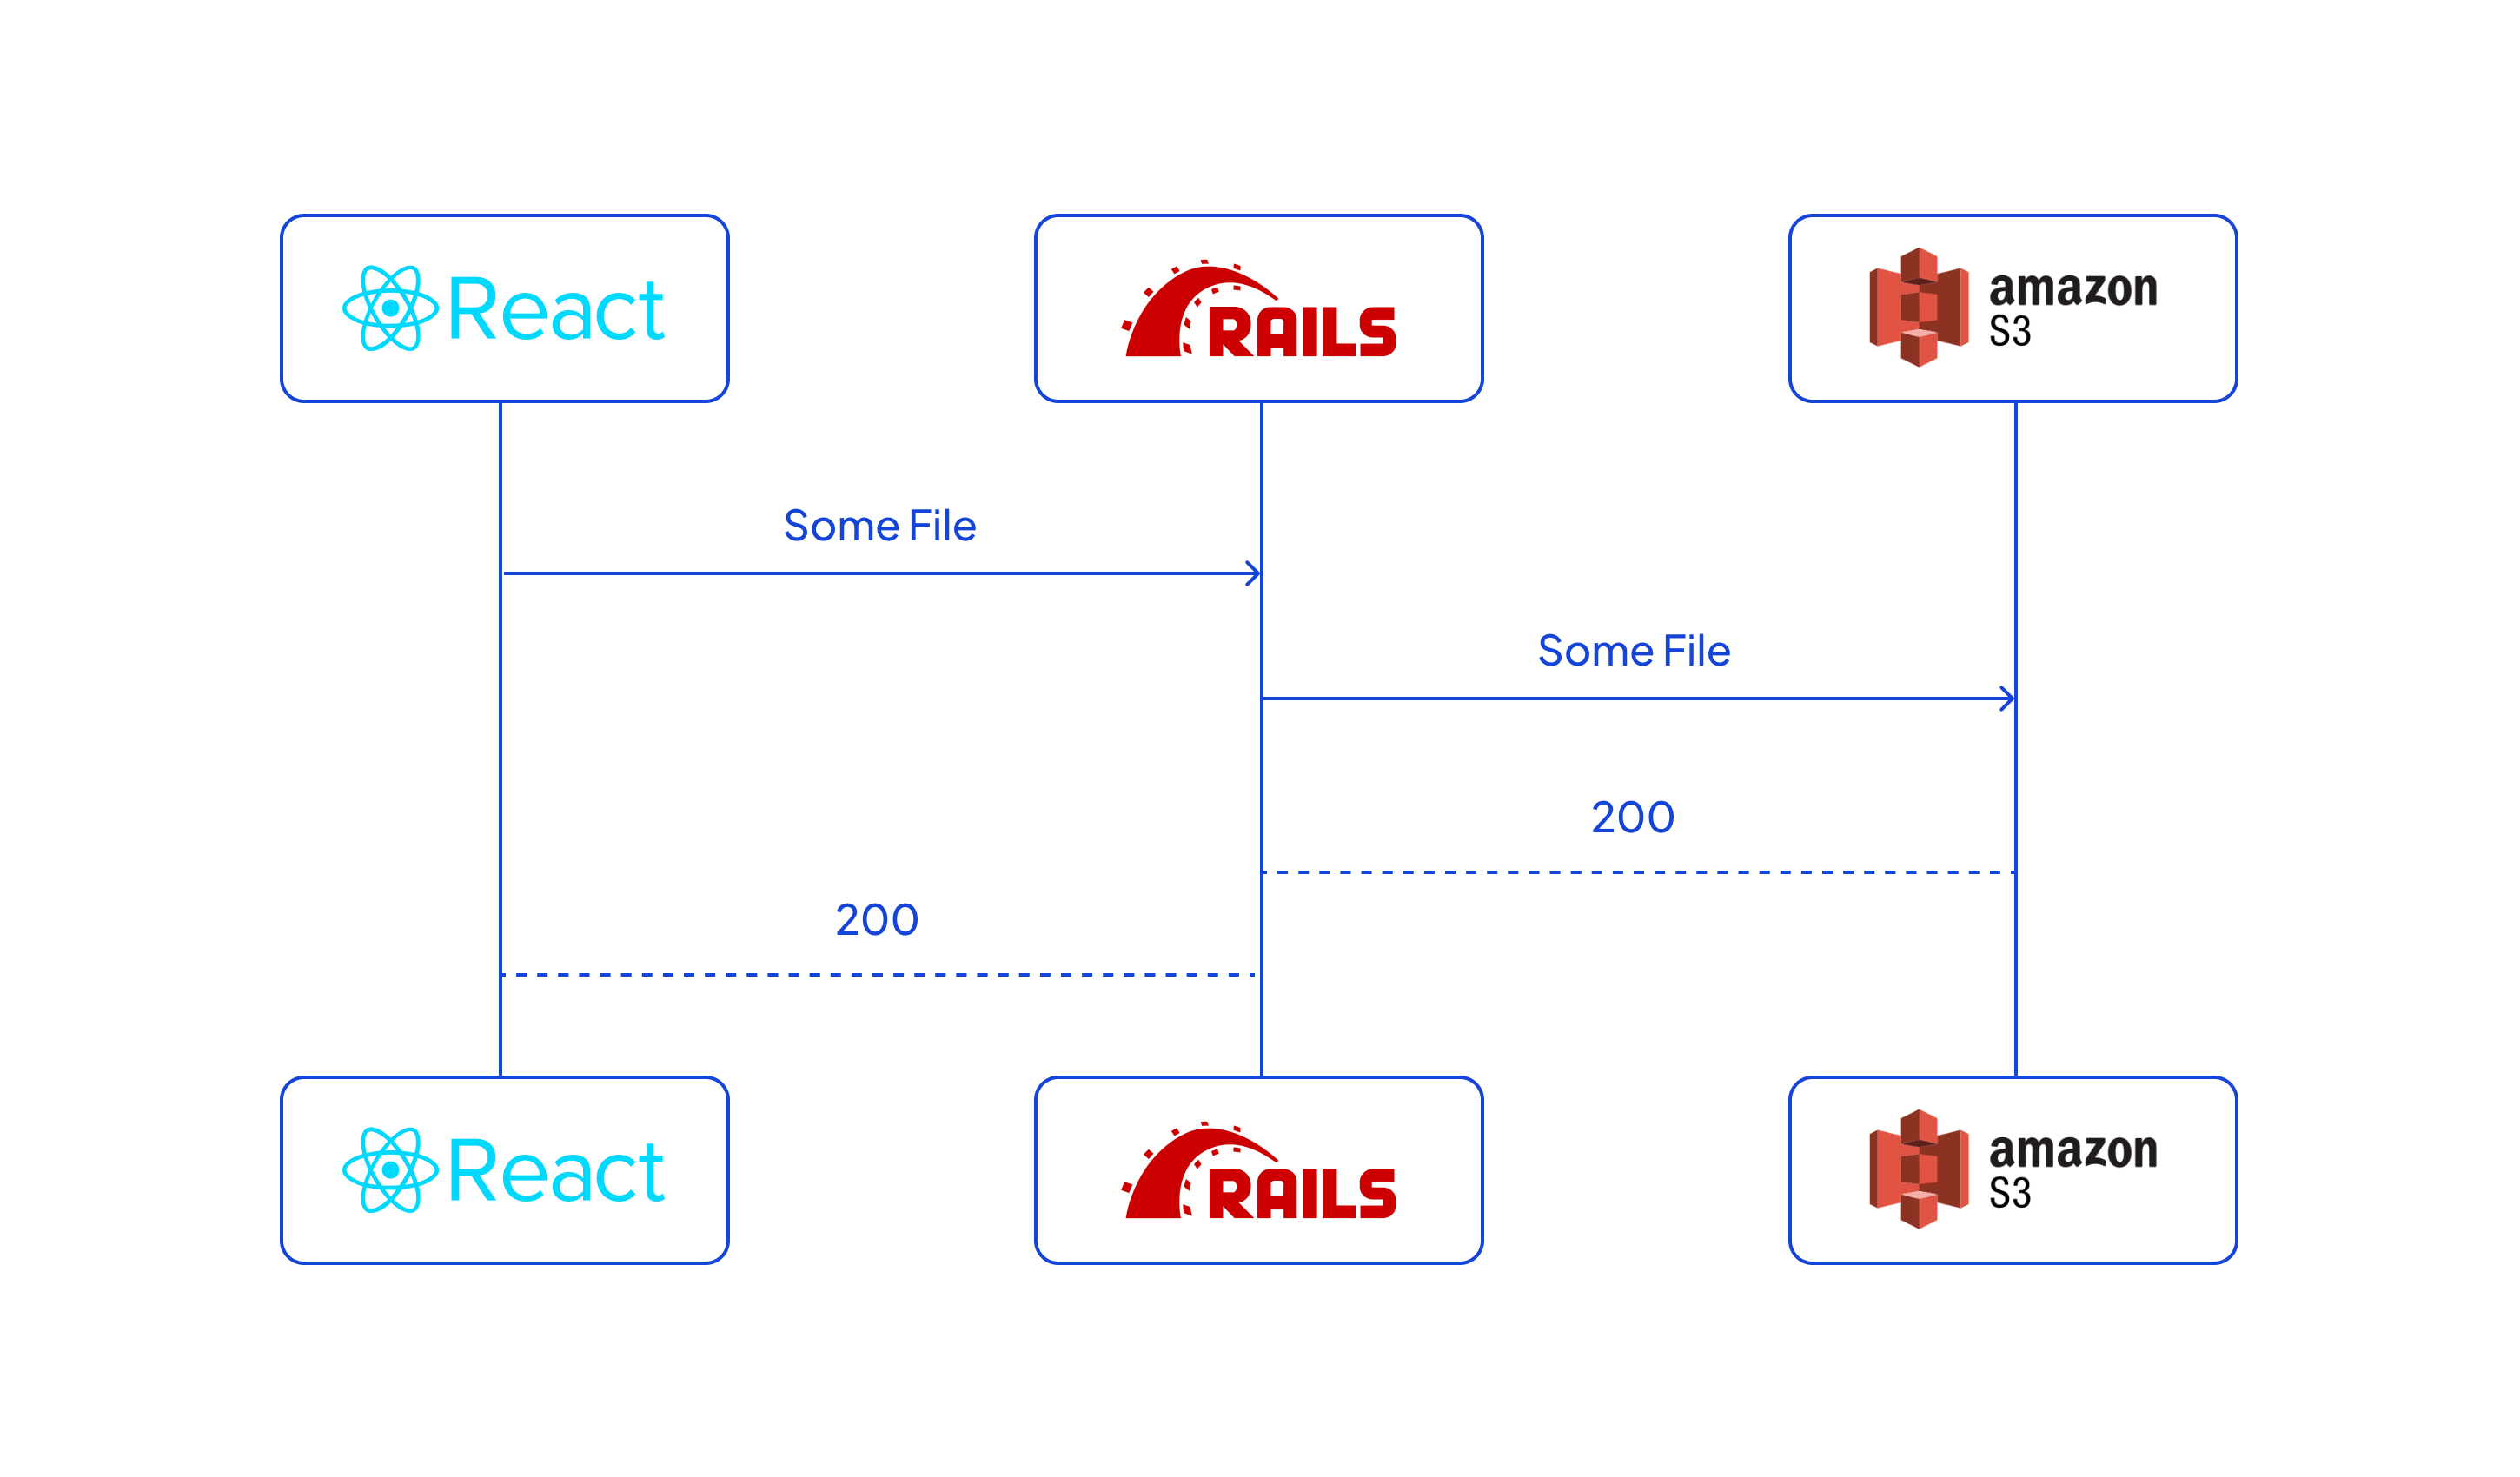
This poses two problems: First, as illustrated in the diagram, the file is sent over the network twice, once from the client to our Rails server, and then from the Rails server to our storage service. Second, during this process the Rails server dedicates a thread to managing these operations, maintaining an open connection with the client.
This could potentially create a bottleneck in the server's capacity. For instance, let's consider a scenario where our server can only handle 10 requests simultaneously. If we have 10 users with slow connections uploading 1GB files to our servers, each taking 10 minutes to complete, the server will become unresponsive for any 11th user attempting to interact with our application during this time.
DirectUpload with Rails
Luckily for us, Rails's own ActiveStorage provides a way more efficient way of handling file uploads through Direct Uploads.
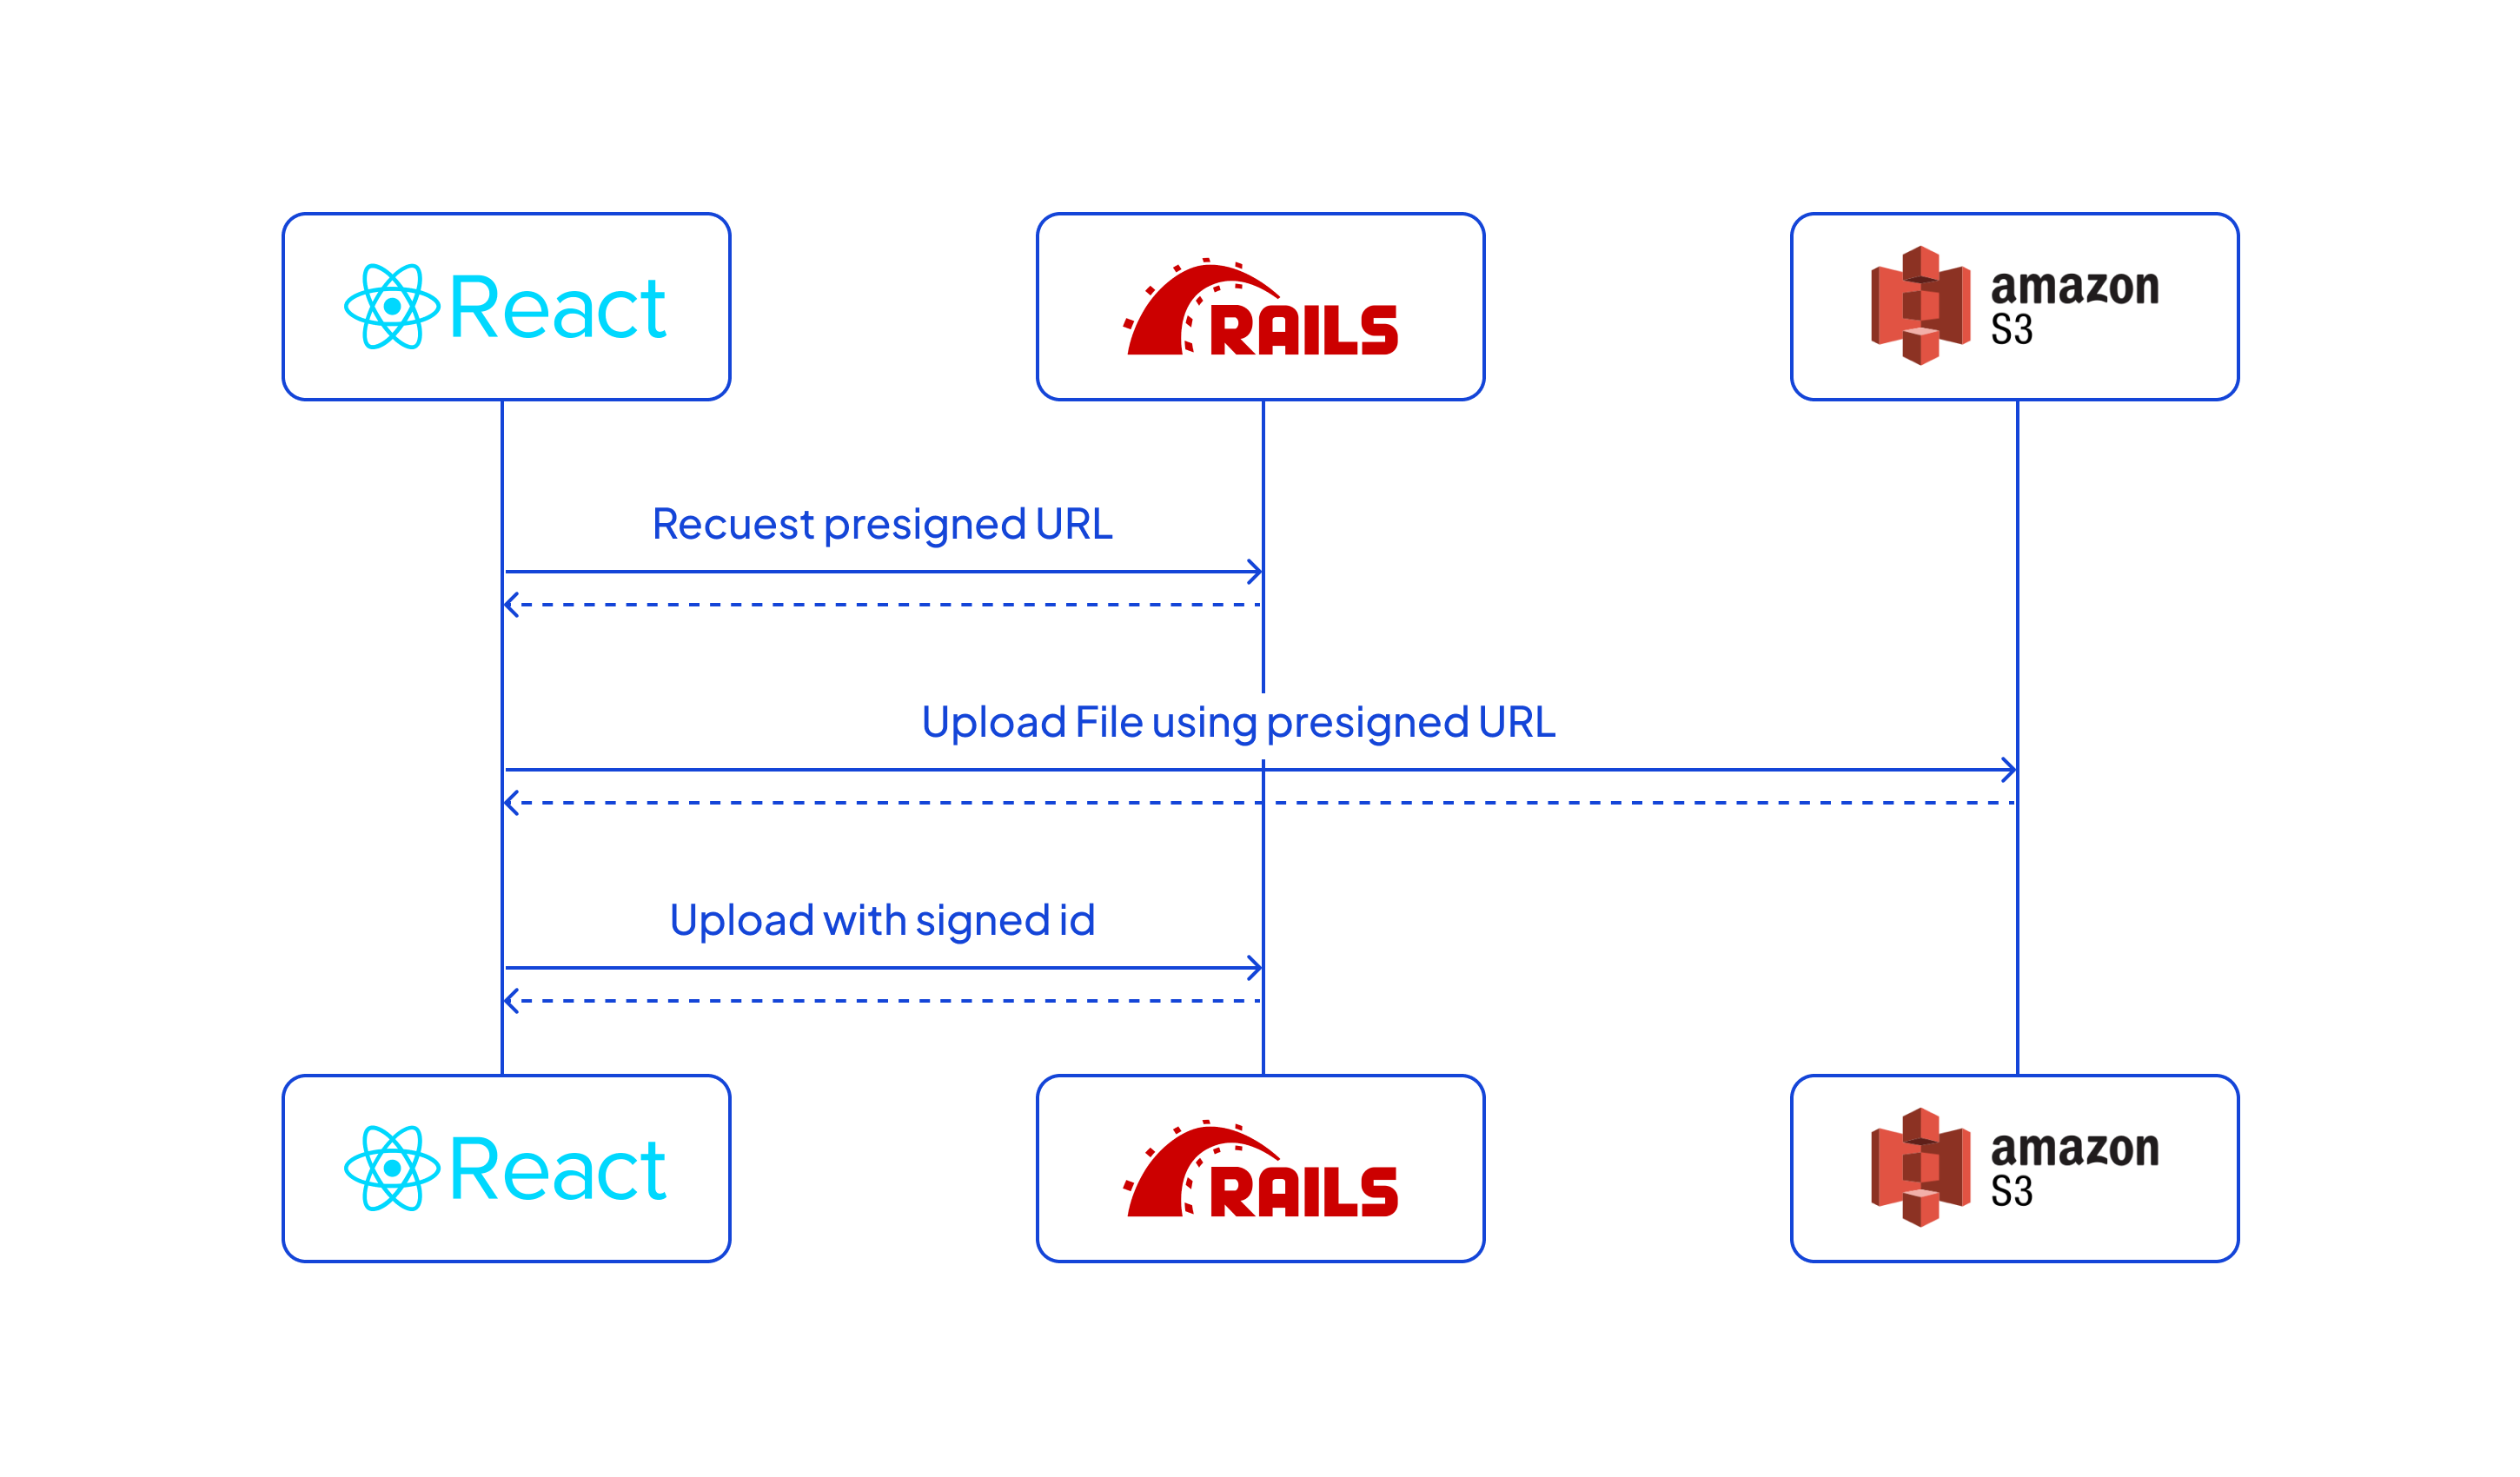
Direct Uploads allow our users to upload their files straight to our storage service, almost completely bypassing our backend. The flow would be the following:
- Our frontend asks our backend for a signed URL to be able to publish files into our storage service, providing some light file data (filename, byte_size, checksum and content_type) to identify the file.
- Our backend creates an ActiveStorage::Blob, and then interacts with our storage service through its API, using our credentials, to get a signed URL from it which it shares with our frontend client. This URL will only work for files with the same file data our client sent.
- Our frontend uploads the file into our storage service using the provided signed URL, and gets back a signed id that references the brand new uploaded file.
- Our frontend notifies our backend that the upload was successful and provides the signed id, for it to store in the database using ActiveStorage. Our backend then creates an ActiveStorage::Attachment to link our model to the file.
One crucial point to note here is that there might be a few hiccups between creating the Blob and attaching it to our model, which could result in some inconsistencies. Specifically, we may encounter:
- Blobs that never got the file properly uploaded into our storage service if something goes wrong with our frontend while doing so (e.g. the end user closing their tab while the upload is in progress).
- Files that got uploaded but never got properly attached to our models (e.g. a validation fails when attaching them, or the frontend fails and never gets to make the last request).
In these scenarios, you can either choose to leave it as it is (the only inconvenience being potentially wasted storage space), or you can devise a couple of workarounds. In my case, I proceeded to set up a worker that removes any Blob that is at least one week old and has never been attached to a model, using the following code. Keep in mind that this approach may not be applicable in your application if there are files you intend to keep unattached for any reason.
If you are working with a plain Rails web app, you can just jump into Rails own documentation on how to set this up, which is pretty straight forward and will get you running in no time. However, if you are working with a Rails API and a standalone JS framework like React in our case, there's not much info there on how to make it work, which is why I'm explaining it in the rest of this article.
Configuring Rails and S3 for Direct Uploads
The first thing we need to do, is to set up a CORS policy on our bucket to allow it to receive files from our client. An important thing to note here is that we want to make sure we set it up so files can only be served from our own domain.
To do so, you can copy paste the following JSON into your bucket's Permissions -> Cross-origin resource sharing (CORS) section, making sure you update the AllowedOrigins field with your domain:
Once our bucket is set up, let's move to our backend code. We need to cover 3 items here:
- Install and set up ActiveStorage so we can interact with our Storage Service.
- Override the default DirectUploadsController so we can skip authentication tokens (since we are using this as an API).
- Set up our target Model and Controller if we don't have them already.
You can find an example working prototype for the Rails backend code in our repos here, but these are the main points to set up Active Storage to use our S3 Bucket:
1) Setting up our Storage Service
You can find a detailed guide on how to do this here, but an overview on what we need to do for Active Storage to use our S3 Bucket is:
- Install ActiveStorage on the project (
bin/rails active_storage:install+bin/rails db:migrate). - Add the
aws-sdk-s3gem to the Gemfile - Set up
config.active_storage.service = :amazon - Edit our
config/storage.ymlwith the proper credentials.
2) Overriding the default DirectUploadsController
This is a simple but important step, since we are using our backend as an API, we don't have the rails authenticity token on our requests, therefore we need to avoid checking for it on the DirectUploadsController, which rails does by default.
We also want to add some sort of authentication to this endpoint, so not everyone can get a link to upload a file into our storage service.
To achieve this, we are going to create a new controller to override the default one, and set up our routes file to use it.
3) Setting up our Model and Controller
On this step, and to show how this does not change at all compared to the standard file upload flow using ActiveStorage, here's our example model and controller, along with the routes for it.
As you can see, there's no difference at all with our standard backend. Rails will recognize if a signed id is what we are sending inside our post[media_files] param and proceed acordingly, so let's move to the frontend code!
Integrating DirectUpload with React Frontend
Now that we have configured our Rails backend to support Direct Uploads, let's dive into integrating this functionality into our React frontend. The process involves making requests to the Rails API to obtain signed URLs and handling the file upload process directly to the storage service.
You can find an example working prototype for the React frontend code in our repo here, but either way, here's an overview of the important considerations to set this all up.
1. Requesting a Signed URL from Rails
In your React component, when a user initiates a file upload, the following code snippet demonstrates how to make a request to the Rails backend to obtain a signed URL for the specific file:
This function uses the DirectUpload class from ActiveStorage to create a direct upload request, obtaining a signed URL from the Rails backend.
2. Direct File Upload to Storage Service and Notifying Backend
Once you have the signed URL and headers from the Rails API, you can proceed with the actual file upload directly to the storage service (e.g. AWS S3). The following snippet shows a simplified example:
3. Main onSubmit Function
The onSubmit function acts as the entry point for the file upload process. It creates a FormData object, pushes file uploads into the array, and then calls the uploadFilesAndSubmit function.
Ensure that you integrate these functions into your React component, and adapt the code according to your application structure and requirements. This comprehensive integration enables Direct Uploads in your React frontend, seamlessly connecting with the Rails backend for efficient file uploads.
Real life metrcis
We didn't want to leave this on just theory, so we went ahead and set up S3 bucket along with one Rails backend supporting both standard and direct uploads, and 2 different frontends, one per method, and took some metrics when uploading files from each of them. Here are some examples on the network tab where you can see how both approaches behave (we ran each request 10 times and took the screenshots that were closer to the average in total time spent):
Standard Upload:

Direct Upload:

As you can see, not only does the direct upload approach take considerably less time all requests considered (120.5s vs 150s for the end user), but also the time our backend API actually spends on this file upload feature is insignificant (0.5s) compared to the standard approach (150s). And an important thing to note is that for this example our server and storage service both live pretty "nearby" on AWS, which makes the internal upload from the server into S3 quite fast; this would not behave this way if we had them "further away". This difference would even impact the end user.
Conclusion
In this article we explored two methods for handling file uploads in Rails, and discussed drawbacks in terms of server load and performance issues. We then focused on the Direct Uploads feature offered by Rails ActiveStorage, which presents a solution, by enabling files to be directly uploaded to the storage service bypassing the server to a large extent.
By utilizing Direct Uploads we not only reduce the burden on our server but also greatly enhance the user experience especially when dealing with large files. The direct communication between the frontend and the storage service streamlines the upload process resulting in faster upload times and decreased stress on the server.
Furthermore we provided insights into configuring Rails and S3 for Direct Uploads while also integrating this functionality into a React frontend. Through examples and real life measurements we demonstrated how using Direct Uploads in a web application can bring benefits.
In summary by embracing Direct Uploads with Rails ActiveStorage developers can optimize file upload workflows, improve application performance and provide a better experience for end users.